franka_gazebo
This package allows you to simulate our robot in Gazebo. This is possible because Gazebo is able to integrate into the ROS control framework with the gazebo_ros package.
Important
This package is available from 0.8.0
Pick & Place Example
Let’s dive in and simulate transporting a stone from A to B. Run the following command to start Gazebo with a Panda and an example world.
roslaunch franka_gazebo panda.launch x:=-0.5 \
    world:=$(rospack find franka_gazebo)/world/stone.sdf \
    controller:=cartesian_impedance_example_controller \
    rviz:=true
This will bring up the Gazebo GUI where you see the environment with the stone and RViz with which you can control the end-effector pose of the robot.
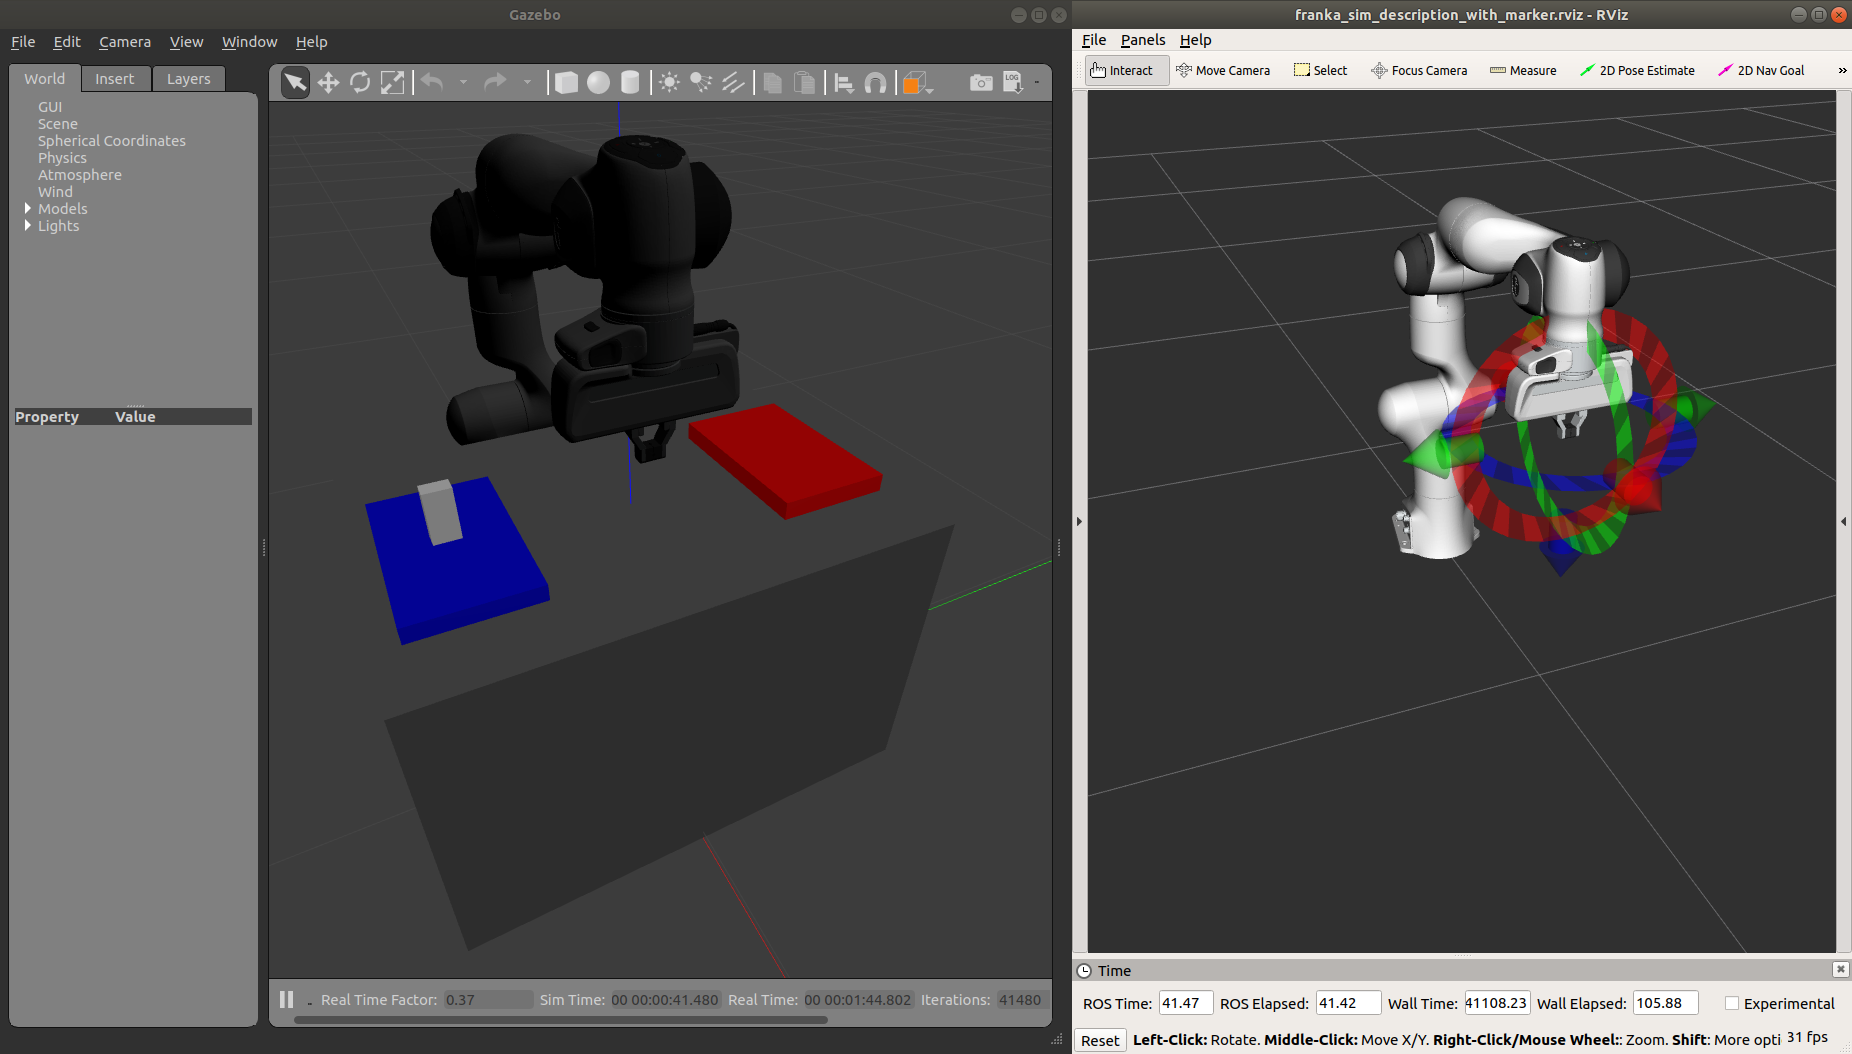
Gazebo GUI (left) and RViz (right) of the pick and place example
To open the gripper, simply send a goal to the move action, similar to how the real franka_gripper
works. Let’s move the gripper to a width of \(8\:cm\) between the fingers with \(10\:\frac{cm}{s}\):
rostopic pub --once /franka_gripper/move/goal franka_gripper/MoveActionGoal "goal: { width: 0.08, speed: 0.1 }"
Since we launched our robot with the Cartesian Impedance controller from franka_example_controllers, we can move the end-effector around, just like in reality, with the interactive marker gizmo in RViz. Move the robot such that the white stone is between the fingers of the gripper ready to be picked up.
Note
If the robot moves strangely with the elbow, this is because the default nullspace stiffness of the cartesian
impedance example controller is set to low. Launch Dynamic Reconfigure
and adjust panda > cartesian_impedance_example_controller > nullspace_stiffness if necessary.
To pick up the object, we use the grasp action this time, since we want to excerpt a force after
the grasp to not drop the object. The stone is around \(3\:cm\) wide and \(50\:g\) heavy.
Let’s grasp it with \(5\:N\):
rostopic pub --once /franka_gripper/grasp/goal \
             franka_gripper/GraspActionGoal \
             "goal: { width: 0.03, epsilon:{ inner: 0.005, outer: 0.005 }, speed: 0.1, force: 5.0}"
Note
In top menu of Gazebo go to View > Contacts to visualize contact points and forces
If the grasp succeeded, the fingers will now hold the stone in place. If not, probably the goal tolerances (inner and outer epsilon) were too small and the action failed. Now move the object gently over to the red dropoff area.
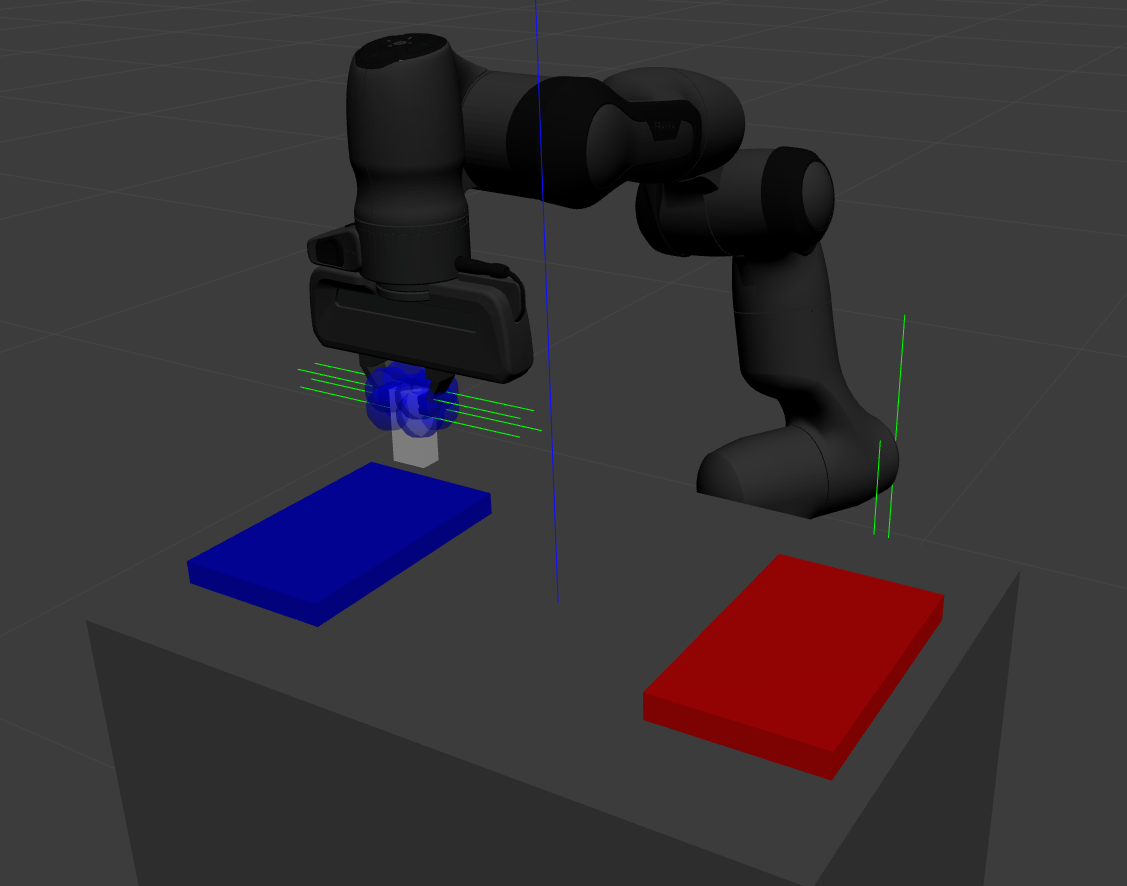
Transport the stone from blue to red
After you placed it gently on the red pad, stop the grasp with the stop action from the gripper:
rostopic pub --once /franka_gripper/stop/goal franka_gripper/StopActionGoal {}
Note that the contact forces disappear now, since no force is applied anymore. Alternatively you can also use
the move action.
Customization
The launch file from franka_gazebo takes a lot of arguments with which you can customize the behavior
of the simulation. For example to spawn two pandas in one simulation you can use the following:
<?xml version="1.0"?>
<launch>

  <include file="$(find gazebo_ros)/launch/empty_world.launch" >
    <!-- Start paused, simulation will be started, when Pandas were loaded -->
    <arg name="paused" value="true"/>
    <arg name="use_sim_time" value="true"/>
  </include>

  <group ns="panda_1">
    <include file="$(find franka_gazebo)/launch/panda.launch">
      <arg name="arm_id"     value="panda_1" />
      <arg name="y"          value="-0.5" />
      <arg name="controller" value="cartesian_impedance_example_controller" />
      <arg name="rviz"       value="false" />
      <arg name="gazebo"     value="false" />
      <arg name="paused"     value="true" />
    </include>
  </group>

  <group ns="panda_2">
    <include file="$(find franka_gazebo)/launch/panda.launch">
      <arg name="arm_id"     value="panda_2" />
      <arg name="y"          value="0.5" />
      <arg name="controller" value="force_example_controller" />
      <arg name="rviz"       value="false" />
      <arg name="gazebo"     value="false" />
      <arg name="paused"     value="false" />
    </include>
  </group>

</launch>
Note
To see which arguments are supported use: roslaunch franka_gazebo panda.launch --ros-args
FrankaHWSim
By default Gazebo ROS can only simulate joints with “standard” hardware interfaces like Joint State Interfaces
and Joint Command Interfaces. However our robot is quite different from this architecture! Next to
these joint-specific interfaces it also supports robot-specific interfaces like the FrankaModelInterface (see
franka_hw). Naturally gazebo does not understand these custom hardware interfaces by default.
This is where the FrankaHWSim plugin comes in.
To make your robot capable of supporting Franka interfaces, simply declare a custom robotSimType in your URDF:
<gazebo>
  <plugin name="gazebo_ros_control" filename="libgazebo_ros_control.so">
    <robotNamespace>${arm_id}</robotNamespace>
    <controlPeriod>0.001</controlPeriod>
    <robotSimType>franka_gazebo/FrankaHWSim</robotSimType>
  </plugin>
  <self_collide>true</self_collide>
</gazebo>
When you spawn this robot with the model spawner this plugin will be loaded into the gazebo node. It will scan your URDF and try to find supported hardware interfaces. Up to now only some of the interfaces provided by franka_hw are supported:
Interface |
Function |
|
|---|---|---|
✔ |
|
Reads joint states. |
✔ |
|
Commands joint-level torques and reads joint states. |
✔ |
|
Commands joint velocities and reads joint states. |
✔ |
|
Commands joint positions and reads joint states. |
✔ |
|
Reads the full robot state. |
✔ |
|
Reads the dynamic and kinematic model of the robot. |
✘ |
|
Commands Cartesian poses and reads the full robot state. |
✘ |
|
Commands Cartesian velocities and reads the full robot state. |
Important
This implies that you can only simulate controllers, that claim these supported interfaces and none other!
For example the Cartesian Impedance Example Controller can be simulated, because it only requires the
EffortJoint-, FrankaState- and FrankaModelInterface. However the Joint Impedance Example Controller
can’t be simulated, because it requires the FrankaPoseCartesianInterface which is not supported yet.
Next to the realtime hardware interfaces the FrankaHWSim plugin supports some of the non-realtime commands
that franka_control supports:
Service / Type |
Explanation |
|
|---|---|---|
✘ |
|
Gazebo does not simulate an internal impedance controller, but sets commanded torques directly |
✘ |
|
Gazebo does not simulate an internal impedance controller, but sets commanded torques directly |
✔ |
|
Sets the \({}^{\mathrm{NE}}\mathbf{T}_{\mathrm{EE}}\)
i.e. the homogenous transformation from nominal end-effector
to end-effector. You can also initialize this by setting the
ROS parameter |
✔ |
|
Sets the \({}^{\mathrm{EE}}\mathbf{T}_{\mathrm{K}}\) i.e. the homogenous transformation from end-effector to stiffness frame. |
✔ |
|
Sets thresholds above which external wrenches are treated as contacts and collisions. |
✘ |
|
Not yet implemented |
✔ |
|
Sets an external load to compensate its gravity for, e.g. of
a grasped object. You can also initialize this by setting
the ROS parameters |
✔ |
|
This is a special service only available in |
FrankaGripperSim
This plugin simulates the franka_gripper_node in Gazebo. This is done as a ROS controller for the two finger joints with a position & force controller. It offers the same five actions like the real gripper node:
/<arm_id>/franka_gripper/homing/<arm_id>/franka_gripper/stop/<arm_id>/franka_gripper/move/<arm_id>/franka_gripper/grasp/<arm_id>/franka_gripper/gripper_action
Important
The grasp action has a bug, that it will not succeed nor abort if the target width
lets the fingers open. This is because of missing the joint limits interface which
lets the finger oscillate at their limits. For now only use the grasp action to close
the fingers!
It is assumed that the URDF contains two finger joints which can be force controlled, i.e. have a corresponding
EffortJointInterface transmission declared. This controller expects the following parameters in its namespace:
type(string, required): Should befranka_gazebo/FrankaGripperSimarm_id(string, required): The arm id of the panda, to infer the name of the finger jointsfinger1/gains/p(double, required): The proportional gain for the position-force controller of the first fingerfinger1/gains/i(double, default: 0): The integral gain for the position-force controller of the first fingerfinger1/gains/d(double, default: 0): The differential gain for the position-force controller of the first fingerfinger2/gains/p(double, required): The proportional gain for the position-force controller of the second fingerfinger2/gains/i(double, default: 0): The integral gain for the position-force controller of the second fingerfinger2/gains/d(double, default: 0): The differential gain for the position-force controller of the second fingermove/width_tolerance(double, default \(5\:mm\)): The move action succeeds, when the finger width becomes below this thresholdgrasp/resting_threshold(double, default \(1\:\frac{mm}{s}\)): Below which speed the target width should be checked to abort or succeed the grasp actiongrasp/consecutive_samples(double, default: 3): How many times the speed has to be consecutively belowresting_thresholdbefore the grasping will be evaluatedgripper_action/width_tolerance(double, default \(5\:mm\)): The gripper action succeeds, when the finger width becomes below this thresholdgripper_action/speed(double, default \(10\:\frac{cm}{s}\)): The speed to use during the gripper action
JointStateInterface
To be able to access the joint state interface from a ROS controller you only have to declare the corresponding joint in any transmission tag in the URDF. Then a joint state interface will be automatically available. Usually you declare transmission tags for command interfaces like the EffortJointInterface.
Note
For any joint named <arm_id>_jointN (with N as integer) FrankaHWSim will automatically compensate its gravity
to mimic the behavior of libfranka.
EffortJointInterface
To be able to send effort commands from your controller to a joint, you simply declare a transmission tag for the joint in your URDF with the corresponding hardware interface type:
<transmission name="${joint}_transmission">
 <type>transmission_interface/SimpleTransmission</type>
 <joint name="${joint}">
   <hardwareInterface>hardware_interface/EffortJointInterface</hardwareInterface>
 </joint>
 <actuator name="${joint}_motor">
   <hardwareInterface>${transmission}</hardwareInterface>
 </actuator>
</transmission>

<gazebo reference="${joint}">
  <!-- Needed for ODE to output external wrenches on joints -->
  <provideFeedback>true</provideFeedback>
</gazebo>
Note
If you want to be able to read external forces or torques, which come e.g. from collisions, make sure to set the
<provideFeedback> tag to true.
FrankaStateInterface
This is a robot-specific interface and thus a bit different from the normal hardware interfaces. To be able to access the franka state interface from your controller declare the following transmission tag with all seven joints in your URDF:
<transmission name="${arm_id}_franka_state">
  <type>franka_hw/FrankaStateInterface</type>
  <joint name="${arm_id}_joint1"><hardwareInterface>franka_hw/FrankaStateInterface</hardwareInterface></joint>
  <joint name="${arm_id}_joint2"><hardwareInterface>franka_hw/FrankaStateInterface</hardwareInterface></joint>
  <joint name="${arm_id}_joint3"><hardwareInterface>franka_hw/FrankaStateInterface</hardwareInterface></joint>
  <joint name="${arm_id}_joint4"><hardwareInterface>franka_hw/FrankaStateInterface</hardwareInterface></joint>
  <joint name="${arm_id}_joint5"><hardwareInterface>franka_hw/FrankaStateInterface</hardwareInterface></joint>
  <joint name="${arm_id}_joint6"><hardwareInterface>franka_hw/FrankaStateInterface</hardwareInterface></joint>
  <joint name="${arm_id}_joint7"><hardwareInterface>franka_hw/FrankaStateInterface</hardwareInterface></joint>

  <actuator name="${arm_id}_motor1"><hardwareInterface>franka_hw/FrankaStateInterface</hardwareInterface></actuator>
  <actuator name="${arm_id}_motor2"><hardwareInterface>franka_hw/FrankaStateInterface</hardwareInterface></actuator>
  <actuator name="${arm_id}_motor3"><hardwareInterface>franka_hw/FrankaStateInterface</hardwareInterface></actuator>
  <actuator name="${arm_id}_motor4"><hardwareInterface>franka_hw/FrankaStateInterface</hardwareInterface></actuator>
  <actuator name="${arm_id}_motor5"><hardwareInterface>franka_hw/FrankaStateInterface</hardwareInterface></actuator>
  <actuator name="${arm_id}_motor6"><hardwareInterface>franka_hw/FrankaStateInterface</hardwareInterface></actuator>
  <actuator name="${arm_id}_motor7"><hardwareInterface>franka_hw/FrankaStateInterface</hardwareInterface></actuator>
</transmission>
When your controller accesses the RobotState via the FrankaStateInterface it can
expect the following values to be simulated:
Field |
Comment |
|
|---|---|---|
✔ |
|
|
✘ |
|
Motion generation not yet supported, field will contain only zeros |
✔ |
|
Can be configured via parameters |
✔ |
|
Can be configured via parameter |
✔ |
|
Can be configured via parameter |
✔ |
|
Will be set from the mass in the inertial tag of URDF, if a hand can
be found, otherwise zero. Can be overwritten by parameter |
✔ |
|
Will be set from the inertia in the inertial tag of URDF, if a hand
be found, otherwise zero. Can be overwritten by parameter |
✔ |
|
Will be set from the origin in the inertial tag of URDF, if a hand can
be found, otherwise zero. Can be overwritten by parameter |
✔ |
|
Can be configured via parameter |
✔ |
|
Can be configured via parameter |
✔ |
|
Can be configured via parameter |
✔ |
|
|
✔ |
|
|
✔ |
|
|
✘ |
|
|
✘ |
|
|
✘ |
|
|
✘ |
|
|
✘ |
|
|
✔ |
|
Comes directly from Gazebo |
✔ |
|
The values send by your effort controller. Zero otherwise. |
✔ |
|
Numerical derivative of |
✔ |
|
Comes directly from Gazebo |
✔ |
|
The last commanded joint position when using the position interface.
Same as |
✔ |
|
Comes directly from Gazebo |
✔ |
|
The last commanded joint velocity when using the velocity interface.
Same as |
✔ |
|
Current acceleration when using the position or velocity interface. However, the value will be zero when using the effort interface. |
✔ |
|
\(\mid \hat{\tau}_{ext} \mid > \mathrm{thresh}_{lower}\) where the
threshold can be set by calling |
✔ |
|
\(\mid \hat{\tau}_{ext} \mid > \mathrm{thresh}_{upper}\) where the
threshold can be set by calling |
✔ |
|
\(\mid {}^K \hat{F}_{K,ext} \mid > \mathrm{thresh}_{lower}\) where
threshold can be set by calling |
✔ |
|
\(\mid {}^K \hat{F}_{K,ext} \mid > \mathrm{thresh}_{upper}\) where
threshold can be set by calling |
✔ |
|
\(\hat{\tau}_{ext}\) i.e. estimated external torques and forces at the end-effector, filtered with a exponential moving average filter (EMA). This filtering \(\alpha\) can be configured via a ROS parameter. This field does not contain any gravity, i.e. \(\tau_{ext} = \tau_J - \tau_{J_d} - \tau_{gravity}\) |
✔ |
|
\({}^O\hat{F}_{K,ext} = J_O^{\top +} \cdot \hat{\tau}_{ext}\) |
✔ |
|
\({}^K\hat{F}_{K,ext} = J_K^{\top +} \cdot \hat{\tau}_{ext}\) |
✘ |
|
|
✔ |
|
Will be the same as the |
✘ |
|
|
✘ |
|
|
✘ |
|
|
✔ |
|
Same as |
✔ |
|
Same as |
✘ |
|
Will entirely be false, reflex system not yet implemented |
✘ |
|
Will entirely be false, reflex system not yet implemented |
✔ |
|
Always 1.0 |
✘ |
|
Robot mode switches and reflex system not yet implemented |
✔ |
|
Current ROS time in simulation, comes from Gazebo |
FrankaModelInterface
This is a robot-specific interface and thus a bit different from the normal hardware interfaces.
To be able to access the franka model interface from your controller declare the following transmission tag with
the root (e.g. panda_joint1) and the tip (e.g. panda_joint8) of your kinematic chain in your URDF:
<transmission name="${arm_id}_franka_model">
  <type>franka_hw/FrankaModelInterface</type>
  <joint name="${root}">
    <role>root</role>
    <hardwareInterface>franka_hw/FrankaModelInterface</hardwareInterface>
  </joint>
  <joint name="${tip}">
    <role>tip</role>
    <hardwareInterface>franka_hw/FrankaModelInterface</hardwareInterface>
  </joint>

  <actuator name="${root}_motor_root"><hardwareInterface>franka_hw/FrankaModelInterface</hardwareInterface></actuator>
  <actuator name="${tip}_motor_tip"  ><hardwareInterface>franka_hw/FrankaModelInterface</hardwareInterface></actuator>
</transmission>
The model functions themselve are implemented with KDL. This takes the kinematic structure and the inertial properties from the URDF to calculate model properties like the Jacobian or the mass matrix.
Friction
For objects to have proper friction between each other (like fingers and objects) you need to tune
some Gazebo parameters in your URDF. For the links panda_finger_joint1 and panda_finger_joint2 we recommend to
set the following parameters:
<gazebo reference="${link}">
  <collision>
    <max_contacts>10</max_contacts>
    <surface>
      <contact>
        <ode>
          <!-- These two parameter need application specific tuning. -->
          <!-- Usually you want no "snap out" velocity and a generous -->
          <!-- penetration depth to keep the grasping stable -->
          <max_vel>0</max_vel>
          <min_depth>0.003</min_depth>
        </ode>
      </contact>
      <friction>
        <ode>
          <!-- Rubber/Rubber contact -->
          <mu>1.16</mu>
          <mu2>1.16</mu2>
        </ode>
      </friction>
      <bounce/>
    </surface>
  </collision>
</gazebo>
Note
Refer to Gazebo Friction Documentation